• Hey Guest,

    We wanted to share a quick update with the community.

    Our public expense ledger is now live, allowing anyone to see how donations are used to support the ongoing operation of the site.

    👉 View the ledger here

    Over the past year, increased regulatory pressure in multiple regions like UK OFCOM and Australia's eSafety has led to higher operational costs, including infrastructure, security, and the need to work with more specialized service providers to keep the site online and stable.

    If you value the community and would like to help support its continued operation, donations are greatly appreciated. If you wish to donate via Bank Transfer or other options, please open a ticket.

    Donate via cryptocurrency:

    Bitcoin (BTC):
    Ethereum (ETH):
    Monero (XMR):
H

HappyApplepie

Member
Aug 4, 2026
16
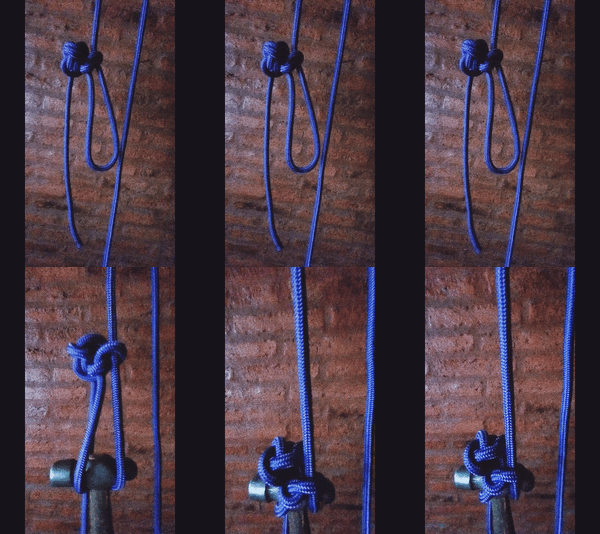
I've been watching videos on how to tie the anchor hitch. Normally, after wrapping the rope around the object, you only need to pass the free end through the two loops once, but I've seen videos where they pass it through twice, and others where they do it three times.
Is there anything important to know about this? How many times should it be passed through?
I hope you don't mind me disturbing you, @JesiBel but I can't decide.
 
JesiBel

JesiBel

protoTYPE:dcclxxvii
Dec 5, 2024
1,173
I've been watching videos on how to tie the anchor hitch. Normally, after wrapping the rope around the object, you only need to pass the free end through the two loops once, but I've seen videos where they pass it through twice, and others where they do it three times.
Is there anything important to know about this? How many times should it be passed through?
I hope you don't mind me disturbing you, @JesiBel but I can't decide.
Hello!

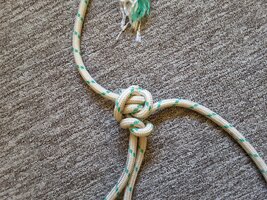
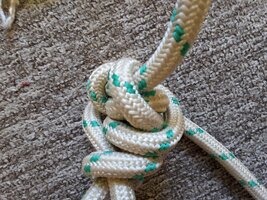
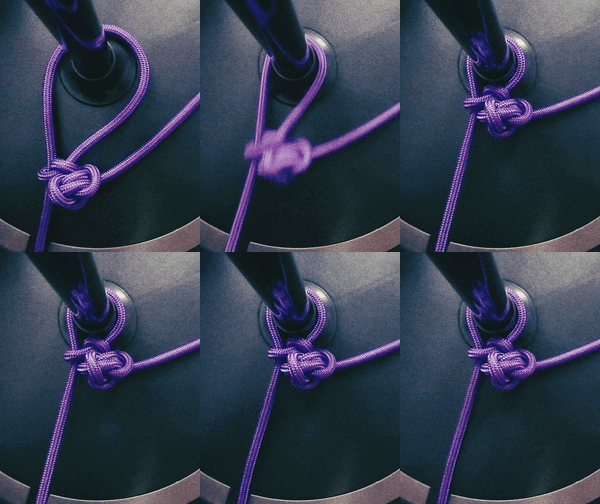
The Anchor Hitch Knot is tied with two turns (wraps) around the object + two half hitches to lock it.


You can tie a stopper knot (overhand knot) at the free end for more security, leaving a free section of about 15 to 20 cm.

Hidden content
You need -1 more posts to view this content
As for modifications and variations, you can make them if you wish.
 
  • Like
  • Informative
Reactions: Praestat_Mori and Nullm
Upvote 0
H

HappyApplepie

Member
Aug 4, 2026
16
Hello!

The Anchor Hitch Knot is tied with two turns (wraps) around the object + two half hitches to lock it.


You can tie a stopper knot (overhand knot) at the free end for more security, leaving a free section of about 15 to 20 cm.

[Hidden content]

As for modifications and variations, you can make them if you wish.

Thank you very much for the help! I am incredibly grateful!
Sorry, but the matter isn't entirely clear to me. Regarding the last version (with three half-hitches): does the second half-hitch pass through the two loops, or is it made the same way as the third one?
Also, since the topic has come up, I have another question and would be very grateful for your help! I'd like to ask about the choice of rope: is a rope with a slippery surface or one with a "tacky" surface better? After all, with a slippery rope, the Arbor Knot tightens more easily under load, but the other end can also slip out more easily (the same applies to the Anchor Hitch).
I have one more question: what is your opinion on the Estar stopper knot?
 
Upvote 0
JesiBel

JesiBel

protoTYPE:dcclxxvii
Dec 5, 2024
1,173
Thank you very much for the help! I am incredibly grateful!
Sorry, but the matter isn't entirely clear to me. Regarding the last version (with three half-hitches): does the second half-hitch pass through the two loops, or is it made the same way as the third one?
Also, since the topic has come up, I have another question and would be very grateful for your help! I'd like to ask about the choice of rope: is a rope with a slippery surface or one with a "tacky" surface better? After all, with a slippery rope, the Arbor Knot tightens more easily under load, but the other end can also slip out more easily (the same applies to the Anchor Hitch).
I have one more question: what is your opinion on the Estar stopper knot?
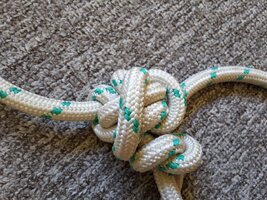
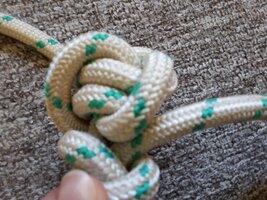
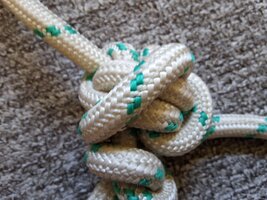
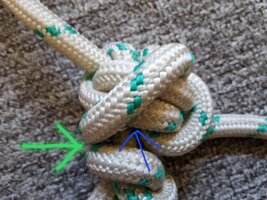
No, 'in variation 2' there are:

1 locking half hitch passed through those wraps (turns)
2 finishing half hitches around the standing part/end (the section of rope that you are not manipulating to tie the knot)

You can tie the EStar Stopper Knot at the free end if you want and if you have enough rope. Any stopper knot will work (perhaps a slightly easier and bulkier one would be the double overhand knot).

The Anchor Hitch Knot, without variations (the first photo), is already perfect for use. You can modify it and get creative, but it doesn't need to be modified to be a more secure knot.

Synthetic ropes (for example polyester, polypropylene) are a good option, they are strong and, as you mention, their surface is soft and smooth. This makes it easier for the Arbor Knot (ligature) to slide easily.


Before buying the rope, check its
Working Load Limit (WLL). Your full weight must not exceed that limit/number.
 
Last edited:
Upvote 0
H

HappyApplepie

Member
Aug 4, 2026
16
No, 'in variation 2' there are:

1 locking half hitch passed through those wraps (turns)
2 finishing half hitches around the standing part/end (the section of rope that you are not manipulating to tie the knot)

You can tie the EStar Stopper Knot at the free end if you want and if you have enough rope. Any stopper knot will work (perhaps a slightly easier and bulkier one would be the double overhand knot).

The Anchor Hitch Knot, without variations (the first photo), is already perfect for use. You can modify it and get creative, but it doesn't need to be modified to be a more secure knot.

Synthetic ropes (for example polyester, polypropylene) are a good option, they are strong and, as you mention, their surface is soft and smooth. This makes it easier for the Arbor Knot (ligature) to slide easily.


Before buying the rope, check its
Working Load Limit (WLL). Your full weight must not exceed that limit/number.
Thank you! Thank you very much! By the way, I hope you understand what I'm writing, as my English isn't very strong.
If I understand correctly, slippery ropes are better because the arbor knot tightens more easily on them (that's why you recommend synthetic ropes). Won't the anchor hitch or the other end of the arbor knot slip out? Because that would be pretty bad.
I read in your posts that the rope diameter should be between 10 and 14 mm. But how do I decide which diameter to choose? I have access to 10, 11, 12, 13, and 14 mm ropes. Which one should I pick? Does body weight matter or what?
 
Upvote 0
JesiBel

JesiBel

protoTYPE:dcclxxvii
Dec 5, 2024
1,173
Thank you! Thank you very much! By the way, I hope you understand what I'm writing, as my English isn't very strong.
If I understand correctly, slippery ropes are better because the arbor knot tightens more easily on them (that's why you recommend synthetic ropes). Won't the anchor hitch or the other end of the arbor knot slip out? Because that would be pretty bad.
I read in your posts that the rope diameter should be between 10 and 14 mm. But how do I decide which diameter to choose? I have access to 10, 11, 12, 13, and 14 mm ropes. Which one should I pick? Does body weight matter or what?
Don't worry, my native language isn't English either.

That won't happen; when you add your weight or a load, the knots will tighten, and the rope won't slip so that the knots come undone on their own.

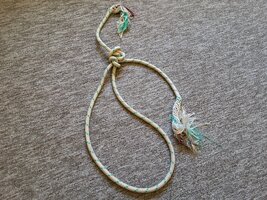
For extra security, the stopper knots are tied, as I mentioned before. The Arbor Knot already has one at the free end (photo here). And behind the stopper knots (those of the ligature and anchor point), leave a 15-20 cm slack of rope, as shown in the photos in this thread.

Practice tying knots well, that's important.

As I mentioned in my previous post, the rope's label or the website where you buy it will have the specifications. Check its Working Load Limit; your full weight shouldn't exceed that number.


As for thickness, my rope is 12 mm polypropylene.
It's a matter of personal preference. A rope that's too thick will make tying knots more difficult (stiff handling) because it's less flexible. With a rope that is too thin, it will be more painful.

Within the range of 10 to 14 mm you can maneuver with ease. You can also experiment with other thicknesses if you wish.

You can read more about this topic in this thread: Rope diameter in hanging, thick vs. thin ropes.


Upvote 0
H

HappyApplepie

Member
Aug 4, 2026
16
Don't worry, my native language isn't English either.

That won't happen; when you add your weight or a load, the knots will tighten, and the rope won't slip so that the knots come undone on their own.

For extra security, the stopper knots are tied, as I mentioned before. The Arbor Knot already has one at the free end (photo here). And behind the stopper knots (those of the ligature and anchor point), leave a 15-20 cm slack of rope, as shown in the photos in this thread.

Practice tying knots well, that's important.

As I mentioned in my previous post, the rope's label or the website where you buy it will have the specifications. Check its Working Load Limit; your full weight shouldn't exceed that number.


As for thickness, my rope is 12 mm polypropylene.
It's a matter of personal preference. A rope that's too thick will make tying knots more difficult (stiff handling) because it's less flexible. With a rope that is too thin, it will be more painful.

Within the range of 10 to 14 mm you can maneuver with ease. You can also experiment with other thicknesses if you wish.

You can read more about this topic in this thread: Rope diameter in hanging, thick vs. thin ropes.


Thank you very much! I have three more questions I don't know the answer to! I would be incredibly grateful if you could answer these as well🙏. I owe you so much for taking the time to help!
1. One of the ropes has 5% stretch; would that be suitable for the purpose? The distance between my feet and the ground is almost exactly 50 cm when I push my chair away.
2. In your description, I read that the noose should be placed between the Adam's apple and the jaw. That's okay, I understand, but you mentioned that the knot should be positioned in the middle of the back of the neck. This might be due to my limited English, but did you mean the middle in a horizontal or a vertical sense?
3. What happens if I tie the last two half-hitches in the opposite direction to the first one? (In other words, if I crossed the first half-hitch over the standing part, I cross the other two under it.)
 
Upvote 0
JesiBel

JesiBel

protoTYPE:dcclxxvii
Dec 5, 2024
1,173
Thank you very much! I have three more questions I don't know the answer to! I would be incredibly grateful if you could answer these as well🙏. I owe you so much for taking the time to help!
1. One of the ropes has 5% stretch; would that be suitable for the purpose? The distance between my feet and the ground is almost exactly 50 cm when I push my chair away.
2. In your description, I read that the noose should be placed between the Adam's apple and the jaw. That's okay, I understand, but you mentioned that the knot should be positioned in the middle of the back of the neck. This might be due to my limited English, but did you mean the middle in a horizontal or a vertical sense?
3. What happens if I tie the last two half-hitches in the opposite direction to the first one? (In other words, if I crossed the first half-hitch over the standing part, I cross the other two under it.)
Yes, that's fine, it's a low percentage of stretch (5%).

As long as your feet don't touch the ground, it will be Full Suspension Hanging. A height of 50 cm between your feet and the ground can work.
What's your anchor point? Perhaps if you can stand on something a little higher you'll have a few extra centimeters.

Make sure the rope is taut and at a height where you can pass your head through the ligature.
You can also pre-adjust the ligature around the neck. In this way, the knot would remain in contact with the neck in its correct position in the center.
This is an illustrative (Photo, warning! Sensitive content) regarding "the center of the neck". This way you can better compress the carotid arteries on both sides of the neck, blocking the flow of oxygenated blood to the brain.


I recommend tying the Anchor Hitch knot in the traditional way, as shown in the first photo (without the variations). The video I added explains how to tie it easily. You just need to add the stopper knot and leave a length of rope at the free end. There's no need to complicate things. You'll find it's a very secure knot when you have your rope. Test it by tying the rope to the anchor point and applying your full weight by hanging from the rope with your hands. (This way you will also test if your anchor point is strong)
 
Upvote 0